
To make a LED light, you’ll need some basic materials. Semiconductors, Diodes, Heat shrink tubes, and resistors are the most common. You’ll also need a template. You can download the template as a PDF file, which includes the layouts for this bulb. To start making your LED light, use your graphic software to evenly distribute 5mm holes on a disk. The larger your disc, the more LEDs it will hold. Once you’ve made a template, print it out and transfer it to a sheet of aluminium. Light glue will make this process go smoothly.
Semiconductors

LEDs are light-emitting diodes, and their basic structure is a junction between two semiconductor materials. When a voltage is applied to this junction, electrons from the n-side move across it to combine with the hole. The resulting light is visible, but the source of energy is not necessarily the same as the one emitted by the LED. There are a few differences between LEDs and fluorescent lights, however.
First, LEDs are made of a semiconductor material called a diode. Diodes are made by purifying various elements. These elements are then placed in a chamber at high temperatures and pressure. Then, a rod is dipped into the solution, which leaves a crystalline layer behind. After the diode is dipped into the solution, it is pulled out of it with the crystalline layer still attached.
A single semiconductor increases in conductivity when an external voltage is applied. Two semiconductors connected to each other form a “p-n-junction,” which generates an electric field under incident radiation. The resulting current varies with the intensity of light absorbed by the semiconductor. Once the light is turned off, the current decreases. This is why led lights are called “emergence” lights.
Once the metal layer is deposited, it will undergo an annealing process. This process involves heating the wafer to several hundred degrees. After this, it needs to be exposed to an inert atmosphere for several hours to bond the metal to the semiconductor. This process is a crucial step in making a LED light, and is one of the main challenges in lowering the production cost of these diodes.
Also Read: How to Install LED Strip Lights on the Ceiling
An LED is a semiconductor light that uses a p-n junction. The semiconductor material in the junction must be a compound semiconductor, since silicon and germanium do not emit light when activated. Gallium arsenide, indium phosphide, and indium phosphide are all compound semiconductors and emit light when activated. Then the LED is activated, releasing energy in the form of photons.
Diodes

LEDs are a kind of light-emitting device. They work by using two types of semiconductor materials, negative and positive. Positive semiconductor materials have electrons while negative semiconductor materials have holes. Both of these types of material emit light when current passes through them. The more electrons that move through the junction, the brighter the light. Unlike the conventional light bulbs, LEDs have a long life span.
LEDs are shaped differently than the usual signal diodes. A standard LED is made of a PN junction surrounded by a transparent epoxy resin body. The epoxy resin body reflects light away from the substrate and concentrates it through the domed top. That is why the light emitted from an LED is brightest on top. However, a single LED can be used to create multiple lights.
A basic LED has a known voltage, milliamps, and resistance. Ohm’s law requires that the LED have a resistance. The resistor acts as a breaker to prevent the source battery from burning out. As an example, an amber-coloured LED with a volt drop of 2 volts is connected to a 5.0v stabilized DC power supply.
In order to create a working LED light, you need to know how to wire it. You can use copper wire, which is the most common type of wire. But if you prefer to use gold wire, you can use silver or gold. Both wires will be easier to solder if they are made of metals. The transparent plastic material also helps make it durable. However, make sure that you follow the manufacturer’s instructions carefully.
Also Read: How to Cut LED Strips
LEDs are current-dependent devices. The forward current that flows through them directly affects the light intensity. Since LEDs are made of semiconductor materials, their forward voltages are low. In fact, most LEDs require voltages of around 1.2 to 3.6 volts (V). This forward voltage varies according to their color, but in general, they range between 20 to 30 milliamps.
Heat shrink tubes
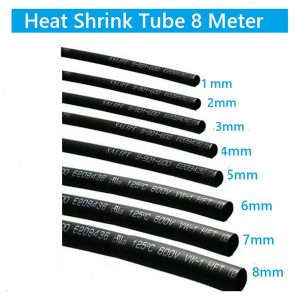
To make a LED light, you’ll need some heat shrink tubing. This type of tubing is a flexible plastic material that contracts when heated. It’s perfect for connecting LEDs and cables. You can also use a lighter to heat the plastic to seal it. Once the plastic is sealed, you can attach the LEDs to the light with the help of a wire. The LEDs can be plugged into the light to create a bright, pulsating effect.
To seal your LED tape light, use waterproof heat shrink. The material shrinks to form a tight seal around the light’s components. This makes it suitable for outdoor use, and for use in locations prone to moisture. A 4:1 ratio of heat shrink tubing ensures that the connection is secure and leak proof. Make sure to use a high-quality heat shrink to prevent damage to your LEDs. Make sure that the heat shrink tube is made of a high-quality plastic and does not contain any chemicals.
To shrink heat shrink tubing, first, determine the shrink ratio. This ratio is the ratio of the original size of the tubing to its shrunk form. This ratio is generally 2:1 or 3:1, with the higher the number, the tighter the fit. If the ratio is 3:1, the tubing will shrink to about one-third of its original size. This method is made possible by the responsiveness of multiple materials, including polyolefin.
Also Read: How to Connect Multiple LED Strip Lights Using a Smart Controller
Once you’ve selected your heat shrink tubing, the next step is choosing the right heat source. Heat shrink tubing is available in a variety of colours, materials, and sizes. Some are adhesive, while others have a meltable inner layer. Make sure to use a heat shrink gun or butane torch with a variable temperature. Regardless of the material used for your LED light project, a high-quality heat source is necessary for a proper heat shrinking process.
Soldering resistors
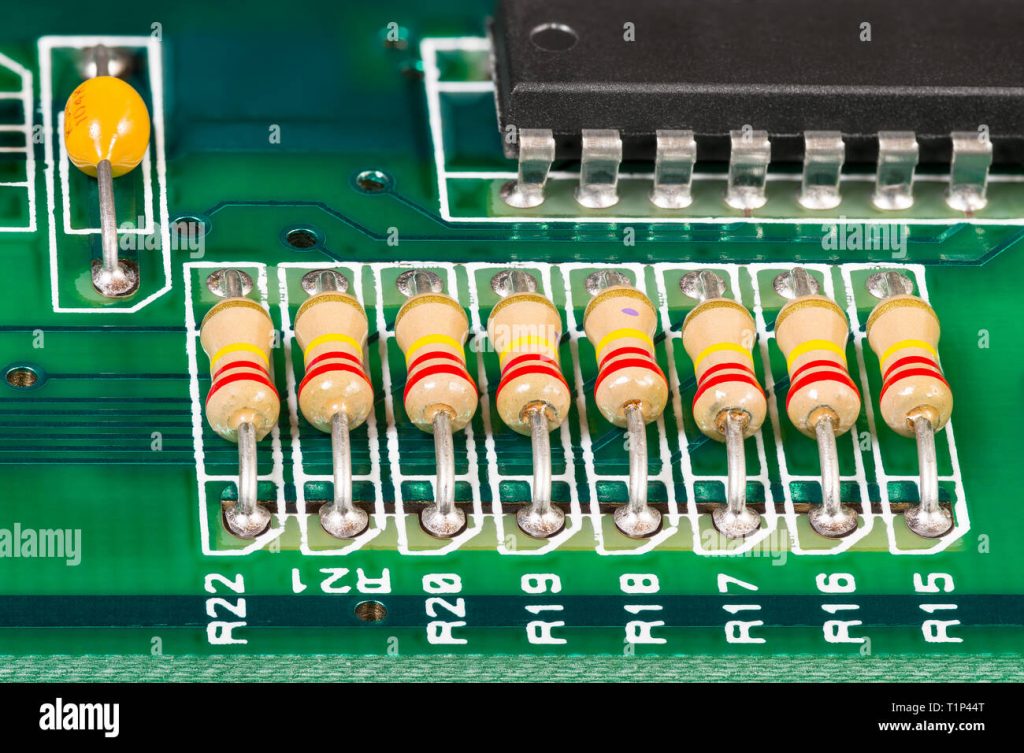
First, prepare your materials. You will need to fully charge the battery pack, wire, resistors, LEDs, and heat-shrink tubing. After you have the materials ready, you should use a utility sink or bathroom sink to dry the tools. You should also wet the sponge used to clean the soldering iron before you begin. Using the utility sink is the easiest way to ensure proper melting.
Cut your wires. You’ll need four wires. Make sure they are 6 inches long. One should be red, and the other should be black. Next, strip the insulation off of the ends of both wires. Solder the ends together, making sure to leave a little slack. Once you’ve soldered both wires, you can attach the resistor to the LED legs.
If the LEDs are on the wrong side, you can cut them off the board. Since resistors are inexpensive, you can easily replace them in case they don’t work out. Remember to check for connectivity before soldering. Also, when using LEDs, make sure to solder them on the pads and check for connectivity. To make the process more convenient, try PLCC-2 LED packaging. It’s small enough to be soldered by hand.
The process of soldering resistors is not complicated if you have experience with surface-mount electronics. The LEDs and resistors on the other side are connected to the resistors on the back side of the PCB. The connection between the LEDs and resistors is through a through-hole. A via is a hole on the circuit board that is plated with copper during manufacture.
Also Read: The Ultimate Guide to Connecting LED Light Strips
To solder resistors, you will need a small piece of solder. Use a soldering iron that is hot enough to melt a small amount of solder. Be sure to keep a fan running in the area where you are soldering. You’ll need it to keep the resistors from coming apart while soldering. Ensure that the soldering iron is clean and doesn’t produce any fumes.